Saturday, February 18, 2017

Arch linux : AUR packages install කරමු


සාමාන්‍යෙන් අපි pacman කියන package manager එක හරහා තමයි arch packages install කරගන්නේ. හැබැයි හැම package එකක්ම pacman වලින් කරගන්න බෑ මොකද by default එකෙන් Arch linux community (AUR - arch linux user reository) එකේ තියෙන packages install කරගන්න බෑ. හැබැයි AUR වල අපිට ඕනි ගොඩක් packages  තියෙනවා.
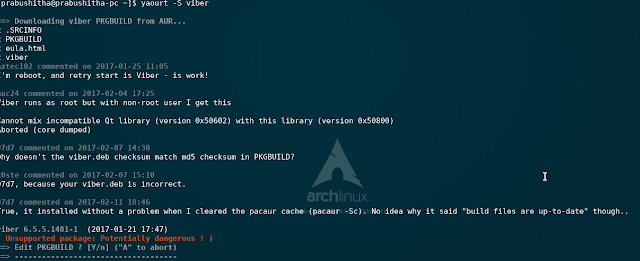
yaourt කියලා package manager එකක් තියෙනවා. එකෙන් අපිට AUR වල තියෙන package දාගන්න පුළුවන්. හැබැයි සමහර packages වලට මේ වගේ errors එනවා. 


අපිට yaourt පාවිච්චි කරන්නේ නැතුව AUR package එකක්  install කරගන්න පුළුවන් විදියක් තියෙනවා. ඒ තමයි makepkg කියන command එක. අපි දැන් බලමු කොහොමද මේක කරගන්නේ කියල.

makepkg command එක වැඩ කරන්න නම් base-devel කියන package එක ඕනි.
pacman -S base-devel 
ඔය විදියට එක දාගන්න. හරි දැන් අපේ වැඩේට බහිමු!

Step 01 - package එක හොයාගෙන PKGBUID file එක download කිරීම 

https://aur.archlinux.org/packages/ වලට ගිහින් අපිට ඕනි package එක හොයාගෙන download snapshot click කරලා package එක install කරන්න ඕනි file එක download කරගන්න. tar.gz file එකක් තමා download වෙන්නේ. මේක ඇතුලේ PKGBUILD file එක තියෙනවා.


Step 02 - tar.gz file එක extract කිරීම 

download උන directory එකට terminal එකෙන් යන්න. ගිහින් tar.gz එක මේ විදියට extract කරගන්න. උදාහරනෙකට මම ගන්නේ heidisql කියන package එක.
(heidisql වෙනුවට ඔයාල download කරපු package එකේ නම දෙන්න)
tar -xf heidisql.tar.gz 
Step 03 - makepkg මගින් package එක build කරලා install කිරීම 

දැන් extract උන folder එකට යන්න මේ විදියට
cd heidisql 
ඊට පස්සේ යට තියෙන command එක ගහල install කරගන්න පුළුවන්.
makepkg -sic 
ඊට පස්සේ confirm screen එකෙන් Y දුන්නම download වෙලා install වෙන එක පටන් ගනී.
  
ඔච්චරයි කරන්න තියෙන්නේ!

ප.ලි.
makepkg -sic කියල ගහල තියන එකේ -sic කියන එකේ තේරුම තමා 
s => අවශ්‍ය dependencies install කරන්න  
i => BUILD වෙලා ඉවර උනාම package එක install කරන්න 
c =>අනවශ්‍ය file clean කරන්න 
තව ඕනි commands https://www.archlinux.org/pacman/makepkg.8.html බලාගන්න පුළුවන් 

Wednesday, February 8, 2017

Arch linux : bash commands කීපයක් සහිත තනි command එකක් හදමු


Linux පාවිච්චි කරද්දී අපිට වෙන එපාම කරපු වැඩක් තමා පොඩි වැඩක් කරගන්න terminal එකේ commands ගොඩක් ගහන්න වෙන එක.

උදාහරණයක් විදියට අපිට apache, php, mysql  servers ඔක්කොම start කරන්න නම් හැම එකම වෙන වෙනම start කරන්න ඕනි (lamp). හැබැයි ඒ ඔක්කොම start කරන commands එක command එකක් විදියට execute කරන්න පුළුවන් නම් එක මරු නේ!

ඉතින් linux අපිට් ඕනි විදියට හදාගන්න පුළුවන් නිසා වැඩේ ගොඩ දාගන්න ලේසියෙන්ම පුළුවන්.
කරන්න තියෙන්නේ මෙච්චරයි,

Step 01 - ඔයා ලියන අලුත් commands දාන්න directory එකක් හදාගන්න
උදාහරණයක්  ලියන commands ටික save කරන්න මම /home/myscripts  කියන තැන තෝරාගන්නවා.

Step 02 - ඒ directory එක bash එකට link කරන්න ඕනි 
bash එකට link කරන්න නම් /etc/bash.bashrc කියන file එකට මේ lines ටික අන්තිමට දාන්න. (අත්තට්ටම මේ කරන්නේ අපේ path කියන variable එකට අපේ commands තියෙන තැන දාන එක)

# if /home/myscripts exists and is a directory & if is not already in your $PATH
# then export /home/myscripts to your $PATH.
if [[ -d /home/myscripts && -z $(echo $PATH | grep -o /home/myscripts) ]]
then
   export PATH="${PATH}:/home/myscripts" 
fi

හරි දැන් අපි අපේ commands ලියමු. එකට මන් lamp උදාහරනේ ගන්නම්.

Step 03 - commands සහිත file එකක් ලිවීම
අපි මුලින් කරන්න ඕනි අදාළ කාර්ය කරන commands සහිත file එකක් හදන එක.
මේ file එකේ නම අපේ අලුත් command එකට දාන නම වෙන්න ඕනි.
මම lamp server එක start කරන්න command එකක් ලියන නිසා මම මේ file එක lampstart කියලා නම් කරනවා.
terminal command එක (using gedit as text editor)
gedit  /home/myscripts/lampstart

දැන් අපි මේ file එකට අපි කරන දේට අදාළ commands ටික මේ විදියට දාන්න ඕනි. (මම කරන්නේ lamp start කරන එක. ඔයාලට ඔයාලට ඕනි commands ටික දාගන්න පුළුවන්)
#!/bin/bash    
#start apache  
echo "starting lamp server..."
sudo systemctl start httpd
#start mysql  
sudo systemctl start mysqld
echo "lamp server started!"

(echo ටික දාල තියෙන්නේ එතකොට run වෙන්න පටන් ගත්ත දැන් හරි start උනා වගේ එව්වා ටෙර්මිනල් එකේ print කරන්න පුළුවන් නේ. # කියන්නේ comments)

 දැන් ඉවරයි. ඕක save කරලා terminal එකේ lampstart කියල ගහලා බලන්න. සුකිරි වගේ වැඩ කරන්න ඕනි.

ඔය විදියට දැන් පුළුවන් commands ගොඩක් execute වෙන තනි command හදල run කරන්න. commands  ටික තියෙන file එකක් විතරයි හදන්න තියෙන්නේ අලුතෙන් හදපු directory එකේ!

Sunday, February 5, 2017

Arch linux හා i3 window manager : වැදගත් configurations කීපයක්


i3 එකේ ඔක්කොම වැඩ වෙන්නේ i3 config file එකෙන්. අපි i3 අපිට ඕනි විදියට හදාගන්න නම් config file එක edit කරන්න ඕනි.
config file එක arch linux වල
~/.config/i3
කියන directory එකේ තියෙනවා.
සැ.යු. යට තියෙන commands config එකට දැම්මට පස්සේ එක වැඩ කරන්න නම් i3 reload කරන්න.
(reload කරන හැටි අන්තිමට තියෙනවා)   


1. wallpaper එකක් set කර ගන්න 
පහත line එක config file එකට add කරන්න.
exec --no-startup-id feh --bg-fill ~/Pictures/pic.png 
 ~/Pictures/pic.png කියන්නේ පින්තුරේ තියෙන තැන.

2. screen එක lock කරන්න   
පහත line එක config file එකට add කරන්න.
bindsym $mod+l exec i3lock
 දැන් අපිට් පුළුවන් $mod key එක එකක් L key එක ඔබලා screen එක lock කරන්න.
(හදිස්සියෙවත් ඕක වැඩ නෑ කියන්නේ i3lock එක install කරලා නෑ වගේ සීන් එකක්. පොඩ්ඩක් බලන්න i3lock install කරලා ද කියලා)

3. screen print කරන්න  
මම use කරන්නේ scrot කියන tool එක screen ප්‍රින්ට් කරන්න. කැමති ටූල් එකක් තෝරාගෙන keys bind කරගන්න පුලුවන් අවුලක් නෑ.

scrot install කරන්න terminal එකේ මේ command එක ගහන්න.
pacman -S scrot
අපි image editor එකකුත් ඒ එක්කම install කරගමු ගහන screenshot එක open කරගන්න.
gimp image editor එක දාගන්න
pacman -S gimp
කියල ටෙර්මිනල් එකේ ගහන්න

හරි දැන් print key එක scrot printscreen එකට bind කරන්න පහත lines config file එකට add කරන්න.
# print screen - whole screen 
bindsym Print exec scrot -e 'mv $f /tmp/ && gimp /tmp/$f' 
# print screen - select window or rectangle 
bindsym $mod+Print exec scrot -s -e 'mv $f /tmp/ && gimp /tmp/$f'
දැන් හරි.


තව මොනවද කරන්නේ? 

ඔය මං කිව්වේ වැදගත් වෙන configurations ටිකක් විතරයි i3 පටන් ගන්න කෙනෙකුට.
ඔය කට්ටියට දැන් ඔය configuration commands බැලුවොත් මේ වගේ දේවල් ටිකක් නිරීක්ෂණය කරන්න පුළුවන්.

  • #            - comment   
  • bindsym - key combination එකක් linux command එකකට bind කරගන්න පුළුවන්.
                        මේ වගේ syntax එකක් තම එකට තියෙන්නේ.
                     bindsym key_combination linux_command
  • නිකන්ම් configuration file එකේ linux command එකක් දැම්මොත් එක i3 start වෙද්දීම run වෙනවා.
    (wallpaper එකක් set කර ගන්න උදාහරනේ වගේ)


i3 reload කරන්න පුළුවන් යට තියෙන විදි දෙකෙන්ම
key combination 
$mod + shift + r 
terminal එකේ 
i3-msg restart


Arch linux හා i3 window manager : audio functions configure කිරීම්


Arch linux හා i3 window manager වල audio keys වලින් වැඩ කරන්න නම් අපි ඒ keys අදාල functionalities වලට assign කරන්න ඕනි. අපි බලමු කොහොමද එක කරන්නේ කියලා.

STEP 01 - installing audio functions package

මුලින්ම linux වලට audio functionalities පහසුවෙන් කරගන්න alsa-utils package එක දාගෙන ඉන්න ඕනි.
pacman -S alsa-utils
STEP 02 - assigning keys

හරි, දැන් අපි volume keys වලට sound අඩු වැඩි කරන සහ mute කරන commands අදාල keys වලට bind කරගන්න ඕනි. එකට i3 config file එක open කරගන්න.
(config file එක ~/.config/i3 directory එකේ තියෙන්නේ )
ඒ file එකට පහත lines ටික එකතු කරගන්න.

i3 config file
#volume control
bindsym XF86AudioRaiseVolume exec amixer -q set Master 1%+ unmute
bindsym XF86AudioLowerVolume exec amixer -q set Master 1%- unmute
bindsym XF86AudioMute exec amixer -q set Master toggle

දැන් අපි i3 reload කරලා බැලුවොත් volume down, volume up සහ mute keys වලින් අදාල functions කරගන්න පුළුවන් කියල බලාගන්න පුළුවන්.
හැබැයි graphically කොහෙවත් එක අපිට පෙන්නන්නේ නෑ. එක නිසා අපි දැන් volume එක status bar එකේ පෙන්නන්න හදාගමු.

STEP 03 - show volume graphically

status bar එකේ volume එක පෙන්නන්න හදාගන්න නම් i3status.conf file එක edit කරන්න ඕනි. එකට යට තියෙන code එක අන්තිමට එකතු කරන්න විතරයි තියෙන්නේ.
i3status.conf file 
#volume show
volume master {
format = "♪ %volume"
device = "default"
mixer = "Master"
mixer_idx = 0
}
order += "volume master"

දැන් i3 reload කරන්න.


i3 reload කරන්න පුළුවන් යට තියෙන විදි දෙකෙන්ම
key combination 
$mod + shift + r 
terminal එකේ 
i3-msg restart

Saturday, February 4, 2017

Arch linux හා i3 window manager : Install කිරීම


i3 කියන්නේ window manager එකක්. Linux වල desktop environment එකක් නැතිව අපිට window manager එකක් පාවිච්චි කරන්න පුළුවන්. ඔය උඩ තියෙන්න i3 වල screenshot එකක්. මේක use කරන එක ගොඩක් developersලට පහසුයි වගේම ඉකමනින් වැඩක් කර ගන්න පුළුවන්. මොකද keys එකතු කරලා (key bindings) අපිට ඕනි විදියට application open/close වෙන එව්වා වගේම terminal commands run කරවන්න පුළුවන්.
අනික් එක තමා window tiling.

i3 වල feature (resource : https://i3wm.org)

දැන් බලමු කොහොමද i3 arch linux වලට දාගන්නේ කියලා.

මුලින්ම terminal එක open කරලා,
pacman -S i3 
ඊට පස්සේ all දීල components 3ම install කරගන්න.

ටෙර්මිනල් එකේ 
startx 
කියල type කරන්න. එතකොට i3 window manager එකට යනවා.

මුල්ම සැරේට යද්දී අහනවා arch configure කරන්න. ඒ configure screen එකේ $mod යතුර තෝරන්න ඕනි.
ගොඩක් කට්ටිය එක window key එක තමා $mod එකට දාන්නේ.
  • terminal එක open කරන්න නම්
    $mod + enter
    key combination එක පාවිච්චි කරන්න පුළුවන්.

  • i3 manager එකෙන් exit වෙන්න නම්
    $mod + shift  + E
    key combination එක පාවිච්චි කරන්න පුළුවන්.

(configure screen එක අවේ නැති උනොත්, default $mod key එක තමා alt key එක)

i3 එකේ ඔක්කොම වැඩ වෙන්නේ i3 config file එකෙන්. අපි i3 අපිට ඕනි විදියට හදාගන්න නම් config file එක edit කරන්න ඕනි.
config file එක arch linux වල
$HOME/.config/i3
කියන directory එකේ තියෙනවා ($HOME කියන්නේ userගේ home directory එක)


i3 එකේ status bar එක වෙනස් කරන්න නම්

/etc/i3status.conf 

කියන file එක edit කරන්න ඕනි


පස්සේ පොස්ට් එකකින් බලමු කොහොමද i3 අපිට ඕනි විදියට configure කරන්නේ කියලා!

Arch Linux වලට composer දාගමු


php පාවිච්චි කරන යට ඉතා වැදගත් tool එකක් තමා composer කියන්නේ. මේක dependency management tool එකක්. ඒ කියන්නේ අපි කරන project එකට අවශ්‍ය external libraries/packages install කරන්න, update කරන්න වගේ දේවල් කරන්න පුළුවන් composer පාවිච්චි කලොත් ලේසියෙන්.
මේක arch package එකක් විධියට තියෙනවා. එක හින්ද arch වල නම් ලේසියෙන්ම pacman package manager එක හරහා දාගන්න පුළුවන් ගේමක් නැතුව. terminal එක open කරලා මේ විධියට (සාමාන්‍ය package එකක් install කරන විදියට) enter කරන්න 

pacman -S composer

දැන් අපි composer bin directory  එක path variable එකට set කරන්න ඕනි. 

එකට කරන්න තියෙන්නේ /etc/bash.bashrc එකේ මේක දාන එක.
(arch වල composer directory එක එන්නේ ගොඩක් වෙලාවට අදල user ගේ home directory ඒකේ .config කියන directory එකේ)  
# if ~/.config/composer/vendor/bin exists and is a directory & if is not already in your $PATH
# then export ~/.config/composer/vendor/bin to your $PATH.
if [[ -d $HOME/.config/composer/vendor/bin && -z $(echo $PATH | grep -o $HOME/.config/composer/vendor/bin) ]]
then
    export PATH="${PATH}:$HOME/.config/composer/vendor/bin"
fi 

දැන් වැඩේ හරි. කරන්න තියෙන්න ඔය ටික තමා.


ප.ළි :
අපි composer bin directory එක path variable එකට set කරන්න හේතුව තමා එතකොට අපිට පුළුවන් අපි install කරන libraries/packages terminal commands විදියට බාවිත කරන්න.
උදා: laravel framework එක composer වලින් දාගත්තට පස්සේ laravel කියන command එක terminal එකේ ගහල පාවිච්චි කරන්න පුළුවන් වෙන්න ඕනි. එහෙම කරන්න නම් bin directory එක path variable එකට set වෙලා තියෙන්න oni.  


linux වලට composer දාන ආකාරය composer site එකෙත් දල තියෙනවා 
https://getcomposer.org/download/